As an Amazon Associate, we earn from qualifying purchases. Your price is never affected. Full affiliate disclosure.
This post contains affiliate links. As an Amazon Associate, I earn from qualifying purchases. Your price is not affected. Affiliate & Ad Disclosure
Starting in late May, the kindergarten supplies started trickling in. By mid-June, one entire corner of our living room had become a Lauren storage depot. Her backpack, extra clothes, indoor shoes, water bottle, art supplies—you name it, it lived in our living room. Every morning, I’d hear “Mom, where’s my…?” at least three times before we even got out the door.
I didn’t really understand the power of visible storage until we actually needed it. That’s when it clicked: if kids can see their stuff, they’ll actually put it away and find it themselves. After a month of trial and error, I’m sharing the five storage solutions that stuck around. If you’re prepping for school, drowning in toys, or just tired of asking “where did you put that?” ten times a day, maybe one of these will help.
These are all products we’ve actually been using for weeks now. Prices range from around $12 to $35, and I’m being honest about what works and what doesn’t in real life.
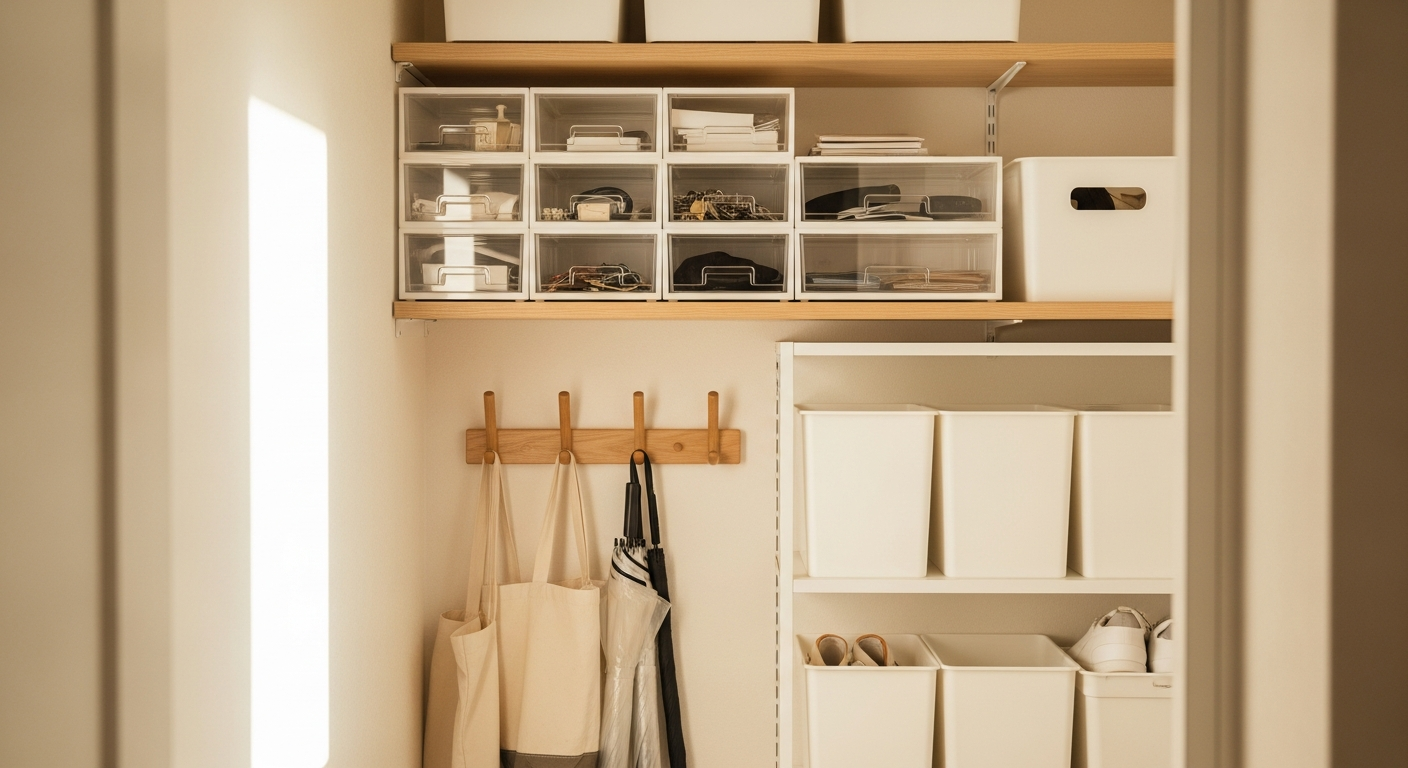
Clear 3-Drawer Organizer — Lauren Picked This One Herself
I was all set to choose something sleek and minimalist. Then Lauren looked at the opaque storage containers and said, “Mom, you can’t see what’s inside.” That’s when I realized: if she can’t see it, she’s not going to use it.
So we picked it out together. The moment Lauren saw this clear 3-drawer organizer, she pointed and said, “That one.” Turns out, from a kid’s perspective, seeing through the drawer makes all the difference. It transforms “Mom’s stuff” into “my stuff.”

Top drawer: extra underwear, socks, and t-shirts for school. Middle drawer: crayons, colored pencils, and a sketchpad. Bottom drawer: hand sanitizer wipes and backup water bottles. Once I added labels to the front of each drawer, Lauren actually started packing her own backpack on her own. (Not every day—some mornings she still asks for help—but it’s progress!)
Yes, you can see dust through the plastic, so we wipe them down once a week. But honestly, that’s a small trade-off for how much it’s actually working. At around $20, it assembles in about 10 minutes flat.
Kid-Height Wall Hooks — Why Our Floor Was Always a Mess
That backpack lived on our living room floor. We tried hanging it on the coat rack, but it was too heavy and kept slipping off. We tried the back of a chair, but Lauren couldn’t reach it easily. So it just… sat there.
Then I hung kid-height wall hooks on the wall next to our entryway. I installed them at about 32 inches up—right at Lauren’s shoulder height (she’s about 3’5″). The difference was instant. She’d come home and immediately hang up her backpack. She still does.

I got a pack of three hooks and divided them by purpose: backpack, hat, and light jacket. You can use adhesive strips, but since her backpack can get pretty heavy, we went with the screw-mounted version. (The adhesive works fine for lighter items, but anything over a couple pounds is risky.)
These run about $15 per pack and come in white, wood tone, and gray. We went with white to match our walls. It sounds simple, but it genuinely changed our mornings.
Label Maker — The Tool I Didn’t Think I Needed (But Do)
When I first mentioned buying a label maker, my husband said, “Can’t you just use a permanent marker?” Fair point. But after labeling everything with a Sharpie—which looked messy, and meant we couldn’t change anything—I finally got one.
The portable label maker connects to your phone via Bluetooth. You type what you want in the app and hit print. Done. Lauren asked me to make labels with her name, so now she has little name stickers too.

I’ve labeled the drawers (“Extra Clothes,” “Art Supplies,” “Snacks”), the toy bins (“Blocks,” “Stuffed Animals,” “Cars”), even the containers in our fridge. You can add emojis too, so labels look like “🧸 Stuffed Animals” or “🖍️ Crayons.” It feels silly, but it actually helps Lauren remember where things go.
At around $32, it’s a small investment. Label tape refills are about $6 per roll. I bought a three-pack, and they’ll probably last me six months. I thought I was splurging, but honestly, it’s become essential to how we organize everything.
Open Storage Baskets (Set of 3) — Lids Are the Enemy
We used to have closed storage bins. They looked clean and tidy. The problem? Lauren couldn’t be bothered to lift the lid to put things away. So toys piled up on top of the bins, and the bins themselves stayed empty.
I switched to open-top fabric baskets without lids. No lid means no barrier between her and actually putting toys away. Plus, they have handles, so she can carry them herself.
I sized them by toy type: large for building blocks, medium for stuffed animals, small for toy cars. Once I labeled each basket, Lauren started sorting stuff on her own. It’s not perfect—sometimes cars end up in the blocks basket—but it’s infinitely better than the pile-on-top system we had before.
The baskets are lightweight (under 10 ounces each), so Lauren can actually pick them up and move them around. They’re machine washable too, which is handy if they get grubby.
A set of three costs around $18. They come in several colors—we chose beige to match our sofa. I’ve seen them in gray and soft mint green too.
Height-Adjustable 4-Tier Shelving — Growing With Your Kid
Twelve months ago, Lauren could only reach the bottom shelf. Now she’s shooting up, and shelf two is her sweet spot. By next year, shelf three will probably be it. Fixed shelving doesn’t adapt, but adjustable shelves do.
Each shelf has holes spaced 2.75 inches apart, so you can move them up or down as your kid grows. Right now, I’ve got shelves 1 and 2 spread far apart to fit storage baskets, and shelves 3 and 4 closer together to hold picture books and art supplies in a small caddy.
Assembly took my husband and me about 30 minutes—there are a lot of bolts, but the instructions are clear. The shelves are made of MDF with a melamine coating, which means you can wipe them down without worrying about water damage.
This unit is about 31.5 inches wide and 47 inches tall, and it fits perfectly against the wall next to our TV. At around $32, it’s affordable enough that you won’t feel like you’ve made a huge commitment. If you want to avoid assembly, there are ready-made versions, but you’ll pay $25–30 more in shipping. The DIY version is definitely worth the 30 minutes.
Perfect Organization Isn’t the Goal
Even with all five of these tools in place, Lauren doesn’t wake up every morning and organize perfectly. Some days blocks end up in the stuffed animal basket. Some days I find her backpack on the floor again. That’s okay.
What has changed: “Mom, where’s my crayon?” happens a lot less. Lauren opens her own drawer and finds it. And every now and then, she’ll say, “Mom, I cleaned up!” with the proudest smile on her face. That moment? That’s worth it.
If you’re drowning in kindergarten prep or just tired of toys everywhere, start with visible storage. Whether it’s clear drawers or open baskets, the magic happens when kids can actually see their own stuff. Once they can see it, they’re halfway to organizing it themselves. The rest is just tweaking along the way.

DCT Family Guide · Laurent’s Mom · Last updated 2026-06-24
Hands-on reviews from a Korean mother of two.
Personal experience-based. Product, policy, and price details may change over time — verify with the source before purchase.
💬 Frequently Asked Questions
❓ Why does clear storage work better for kids than regular bins?
Kids are much more likely to put things away and find them independently when they can actually see what’s inside without opening it. Opaque containers often become ‘out of sight, out of mind,’ which means more questions for you and less independence for them.
❓ What’s the best height for wall hooks if my child is in kindergarten?
Kindergarteners typically do best with hooks installed around 36-40 inches from the floor, roughly at their chest or shoulder height. If they have to reach up or stand on tiptoes, they won’t use the hooks consistently.
❓ Are label makers actually worth it for organizing kids’ stuff?
They’re surprisingly helpful, even for kids who can’t read yet—you can add pictures or symbols alongside words. The real benefit is that labels create clear ‘homes’ for items, so everyone in the family knows where things belong.
❓ How do I get my kids to actually use the storage systems I set up?
Let them help choose the storage solutions and decide what goes where—kids are way more likely to maintain a system they helped create. Keep it simple with open bins or clear containers so putting things away takes one step, not three.